
Hero Carousel content.

For many years, Canon EOS digital cameras have offered two distinct forms of noise reduction for still image files. While they may seem rather self-explanatory, we’ll review them quickly in this article, and hopefully answer any lingering questions or uncertainties some users may have.
Digital noise is a natural by-product of recording still images — primarily visible at higher ISO settings, and (separately) as shutter speeds get progressively longer, usually beyond one or two seconds in duration. Sometimes referred to as “grain,” noise can be visible in either JPEG or RAW digital image files. We won’t dive into a deep technical explanation as to why it’s a factor in these situations, but be aware that even in the latest and highest-performing professional digital cameras, it remains something that photographers sometimes need to consider.
Noise tends to be most visible in solid, mid-tone and slightly darker parts of digital images. In very detailed areas, such as grass or leaves in a landscape image, it tends to be less evident, although of course it can still be observed upon close inspection. And in brighter areas, even those without much texture or subject detail, it often is less noticeable as well.
Noise correction:
High ISO noise reduction, and Long Exposure noise reduction
Two entirely separate types of noise reduction are available in the shooting menu of EOS digital cameras — Long Exposure noise reduction, which suppresses the build-up of what’s often called fixed pattern digital noise during long exposures (longer than 2 seconds of shutter speed time); and High ISO noise reduction, which appears as ISOs tend to be set higher. The latter is the setting most used and inquired about by still-image photographers, so we’ll deal with High ISO noise reduction first.
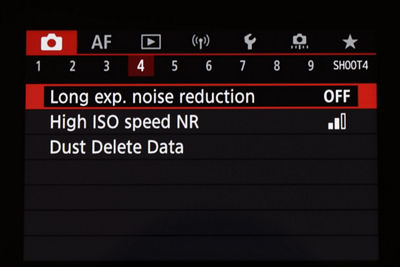
Both Long Exposure noise reduction, and High ISO noise reduction — two entirely separate settings — are available in the shooting menu of most Canon EOS cameras. They can be combined, for photographers looking to correct the “fixed pattern” noise that tends to appear during very long exposures, if they’re also working at higher ISO settings..
Two types of still-image noise, at higher ISO levels
At higher ISOs, digital noise becomes progressively more visible as images are magnified on-screen (or printed at larger sizes). Often mentioned as simply “high ISO noise,” it actually consists of two separate forms of noise:
Luminance noise:
This is the monochromatic, grainy-type noise that becomes progressively more visible upon close inspection of higher ISO images. It has a somewhat salt-and-pepper look, and becomes progressively more visible in lower light levels, as ISOs are raised.
Chrominance noise:
A separate form of digital noise, this likewise has a rather grainy appearance upon close inspection, especially (as mentioned above) in mid-tone or slightly darker areas of a subject or scene, and again it’s most prominent in plain, less detailed areas of a scene or subject. But unlike Luminance noise, Chrominance noise has a rather pastel-colored character, when viewed closely.
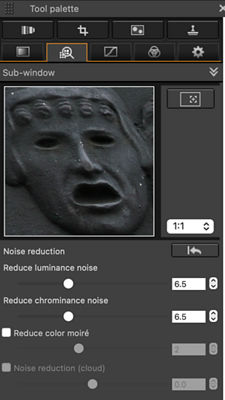
These two distinct forms of digital noise can be separately, independently reduced in software, in your computer — either during RAW file processing, or during actual image-editing with most editing software programs.
Luminance noise tends to contain black and gray aberrations, but housed within them is usually actual subject detail. We’ll address noise reduction in a moment, but for now, just be aware that massive reductions in Luminance noise will usually dramatically soften actual subject detail — so be ready to address it with a fine touch.
Likewise, Chrominance noise may seem unsightly at high magnifications in a high ISO image, but heavy-handed reductions of it (especially at the computer) can begin to shift actual color balance in the scene, and/or impact overall color saturation. Again, when it comes to corrections, more is not always best. In modern digital cameras, at high ISO settings, Luminance noise tends to be most prevalent, and sometimes strong corrections for Chrominance noise may have subtle final effects.
In-camera High ISO Noise Reduction
For years, Canon EOS digital cameras have offered various settings for In-camera Noise Reduction. In the red shooting menu, under High ISO Noise Reduction, recent cameras offer the following choices:
None
Low
Standard
Strong
Multi-Shot Noise Reduction
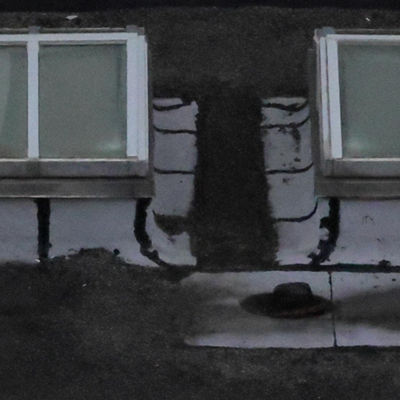
We’ll take a quick look at each, and provide a visual example — all taken from a tripod-mounted EOS R7 camera, at ISO 12,800. The full scene is depicted here; cropped images are from the full-resolution original, inside the area outlined in yellow (below):
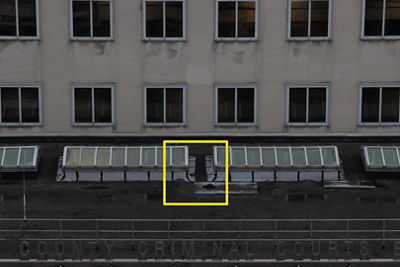
Taken at high ISO, the detailed, magnified images show the differences in noise reduction, at different camera settings.

None
As it suggests, this commands the camera to apply no user-set Noise Reduction, to RAW or JPEG image files. At higher ISO settings, noise will definitely be visible here, but experienced users sometimes prefer to address digital noise as an entirely separate processing or editing step in their computers. In these cases, it may be preferable to begin with an image where no other noise reduction has been applied.
Low
The first level of in-camera noise reduction mostly counters the black and gray Luminance Noise, removing some of the grainy appearance. As usual, it’s particularly noticeable in smooth, evenly-toned regions of the scene, such as the windows toward the top of this magnified view. Note that in the actual file, some Chrominance noise remains visible, upon close inspection, in these areas. Also, at this low setting, fine details (such as around the window frame, etc.) tend to remain well-rendered.

Standard
This is the factory-default menu setting for High ISO Noise Reduction, and frankly is often a good starting point for users exploring image quality at relatively high ISO settings. Predictably, it attacks Luminance noise more aggressively than the Low setting, and accordingly there’s a bit of softness in overall fine detail and apparent sharpness in actual subjects. Chrominance noise remains, albeit at lower levels. The balance of reducing the impact of noise and preserving detail is usually enough for critical users to consider this as a go-to setting in many instances, especially during low-light shooting.
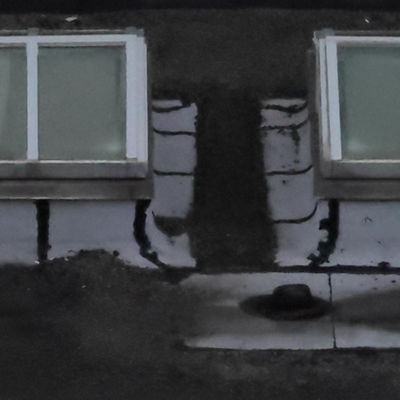
Strong
Now, the balance between fine detail and minimizing high ISO noise begins to tip in favor of eliminating noise — if you look closely, fine details will be softened when the High setting is applied. In instances where super-high ISOs are going to be set in-camera, some users may want to experiment with the High setting, to see if the reduction in both Luminance and Chrominance noise is worth the softening of fine details. Note that this setting is also especially effective in lowering traces of Chrominance noise.

Multi-Shot Noise Reduction
Appearing in more recent EOS models, this is a different way for the camera to achieve reduced noise, particularly at higher ISO levels. It’s available only with JPEG original images, but tends to be most effective of all the noise reduction options in minimizing the impact of Chrominance and especially Luminance noise. There’s some softening of fine details in a scene, but the reduction of visible noise can be dramatic.
As the name suggests, this works by taking multiple, rapid original source images (the camera rapidly shoots four of them, with one press of the shutter button, even if its DRIVE setting has been pre-set for single-frame advance), and then processing the multiple source images into one finished, full-res JPEG file with the noise reduction applied. Since multiple shots are taken to perform this, it’s imperative that the photographer holds the camera as steadily as possible. And, remember that any movement in the scene — such as people walking by, or even wind-blown leaves or grass in a scenic picture — may be recorded as multiple ghost images. Also, keep in mind that some other camera features are intentionally disabled, when Multi-Shot Noise Reduction is activated.
In-camera Noise Reduction and RAW image files
RAW image shooters can use the same in-camera High ISO Noise Reduction settings, with the exception of the Multi-Shot Noise Reduction option (it’s not available for RAW images, for technical reasons). Like nearly all in-camera settings affecting image quality and appearance, once a Canon .CR2 or .CR3 RAW image is opened in RAW processing software (Canon’s DPP, or nearly all third-party software applications), High ISO noise reduction can be completely re-set, using the software’s available tools, palettes, and commands.
Is High ISO Noise Reduction ONLY for high ISO images?
Definitely not! In spite of the naming in the camera’s menu, High ISO noise reduction can be set at any ISO — even at ISO 100, in bright daylight. The camera “knows” the actual ISO being used in a given shot, and will adjust its level of correction for high ISO noise accordingly. Even if set to “High,” at low ISOs like 100 or 200, its corrective impact is done with a rather light touch. Re-set ISO to a higher value, such as ISO 3200 or 6400, and the same noise reduction setting will be much more effective in actually attacking noise in your RAW or JPEG image files.
There’s really no reason to change ISO settings if you find yourself shooting at relatively low ISO numbers, unless from prior experience you have a distinct reason or preference to.
Long Exposure Noise Reduction
This is the second type of in-camera noise reduction, and it’s very different from the High ISO noise reduction we’ve discussed up to now. As digital camera shutter speeds become longer in duration, all digital imaging sensors have a tendency to generate what’s called “fixed pattern” noise on their images. It may be barely noticeable at longer shutter speeds such as 1 second or 2 seconds on modern digital cameras — but for real time exposures, at slower shutter speeds (such as 10 seconds or longer), it can become an increasingly noticeable factor.
When activated in the camera menu, Long Exposure Noise Reduction kicks-in at shutter speeds of two seconds or longer. It is totally ignored, any time you or the camera’s metering system sets a shutter speed faster (shorter in duration) than 2 full seconds — in other words, for typical hand-held shooting, it can be left on in the menu, and it simply has no impact.
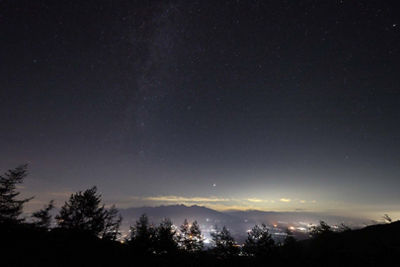
It’s in long exposures such as this night sky scene, at shutter speeds 2 seconds or longer, that Long Exposure Noise Reduction can be especially effective. The longer the shutter is open, in general, the more effective the in-camera Long Exposure Noise Reduction tends to be.
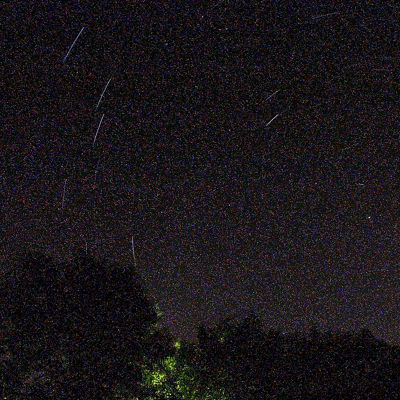
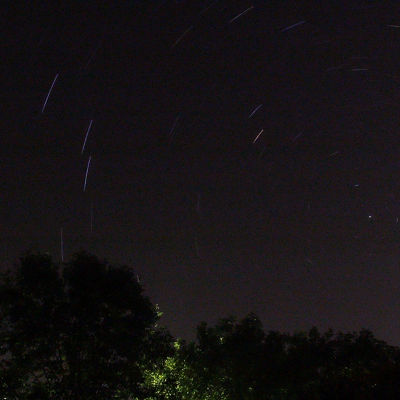
Here is a vivid example of Long Exposure noise reduction — cropped, detailed views of two separate 30-minute long exposures of star trails. It goes without saying that the “ON” example has far greater image quality than the shot with Long Exposure NR turned off.
Working with Long Exposure Noise Reduction
As previously mentioned, Long Exposure Noise Reduction can be left on in your camera’s menu. In ordinary still-image shooting, at shutter speeds faster than 2 full seconds, it has no effect, and is ignored. But if you do work in very low light levels, you’ll find that most recent EOS cameras offer two distinct operation options, in the menu:
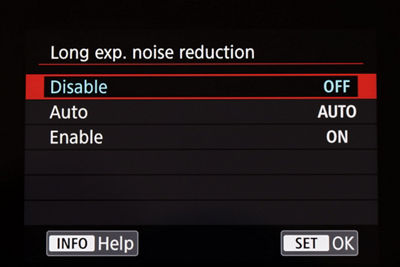
Long Exposure noise reduction offers two menu options — Auto, which will selectively analyze each long exposure image taken and “decide” whether added Long Exposure noise reduction is required, or not. ENABLE simply commands the camera to apply it to any and all images, taken at shutter speeds of two seconds or longer (4 seconds, 8 seconds, and so on… including Bulb exposures).
What happens with Long Exposure noise reduction is this: when you take a picture at sufficiently long (slow) shutter speeds, the camera records the actual image and scene, at the ISO, shutter speed and aperture either you set manually, or that the camera calculated automatically. Then, once that exposure is completed, the camera re-activates the sensor (with the shutter closed, or with electronic shutter set internally not to record actual subject information) for the same length of time.
During this second “blank” exposure, the camera is generating fixed-pattern, long-exposure noise, which builds-up on the sensor as it remains active. After recording this blank exposure for the same length of time that the actual exposure was recorded moments before, the camera now looks at the fixed pattern noise generated in the second blank exposure — and removes it from the same noise that appears in the actual file you shot. That finished image (or RAW file) is now written to the memory card.
A few possible limitations during Long Exposure noise reduction
Possible delays between long exposure shots
During this extended processing time, to record a blank image at the same shutter speed as the actual image and then compare fixed-pattern noise to what appears on the actual file, the camera will be tied-up, and cannot take another picture. The red Card Busy light, usually on the back of the camera, will blink continuously during this processing time, to alert you that you can’t yet take another picture. For subjects like fireworks displays, where you may want to repeatedly record long exposures without a wait between shots, it may be preferable to turn Long Exposure noise reduction off, and apply any noise reduction using software in your computer.
Battery drain during exposures and noise reduction processing
Long exposures apply a steady drain to your camera’s battery, and the same applies when secondary, blank exposures are created for Long Exposure noise reduction processing. This isn’t much to worry about if your shutter speeds are around 5~10 seconds long. But for really long exposures of distant nighttime landscapes, star trails, and so on — 15 minutes and longer, for each image — be aware that with most EOS cameras, a battery charge will tend to last roughly two hours or so of total bulb exposure time (assuming you begin with a fully-charged battery, and that you’re working at normal temperatures).
The pair of 30-minute long exposures of star trails, illustrated above, meant that the drain on the camera’s battery was about 1.5 hours, total (30 minutes for the first image with no Long Exposure noise reduction, and 60 minutes total for the 30 minute exposure with noise reduction applied immediately after it was concluded).
Summary
Photographers are always looking for ways to maximize image quality, even with the spectacular overall performance of today’s digital cameras. Noise is often one of the primary image quality factors mentioned by experienced still-image shooters. While there are numerous software possibilities to reduce noise — some extremely effective — understanding the possibilities within your camera can often be the answer, especially at times where you may need rapid access to finished images.

Thanks for signing up!
The application has encountered an unknown error. Please try again in a few minutes!
By clicking Sign Up, you are opting to receive promotional, educational, e-commerce and product registration emails from Canon USA. You can update your preferences or unsubscribe at anytime.