
DIY Photo & Picture Display Ideas
With the widespread popularity of social media, taking (and posting) lots of pictures on a daily basis has become the norm. But that also means we're capturing way more photos than we actually use and we need some photo display ideas to make the most of the memories we’ve captured.
Creating your own photo displays is not only fun and rewarding, but it also allows you to showcase your artistic side and personalize your living spaces. From elegant photo wall tiles to whimsical pictures hanging on a string, these creative and fun DIY photo display ideas will help you turn your walls into a captivating gallery. All you need is a little inspiration and a versatile PIXMA printer – to make sure those photos are crisp and sharp on any paper type you choose.
Here are some ideas on how to display photos.
1. Photo Tiles for Wall
Custom photo tiles for walls can be arranged in countless ways to fit your space and style. Whether you opt for a grid-like structure or a more freeform arrangement, picture tiles offer a sleek and elegant way to display your favorite memories.
You can create a tiled photo arrangement from a single photo, eliminating the need for a single, over-sized print. Use a photo editor or design software to increase your photo's resolution to 300 dots per inch (DPI), then divide it using the software's grid and/or ruler into several equal-sized squares (ensuring that each square fits on standard 8.5" by 11" paper).
A photo editor like the Easy-PhotoPrint Editor1 is compatible with several Canon printers to crop or resize your photos to the same dimensions before printing. The Canon MegaTank PIXMA G3270 Wireless2 All-in-One Printer is an excellent choice for this type of print job because of its versatility – you can print crisp color photos on a variety of paper types.
Or, you can print several individual photos on the wall for a gallery of photo wall tiles. Start by selecting your preferred photos. Choose photos that have a cohesive theme or color scheme for the best result – like images from memorable trips, family events, or your favorite nature shots – and double-check that they have a resolution of at least 300 dots per inch (DPI).
How to Make Photo Tiles
Once you’ve printed your photo or a collection of photos for your gallery, use spray adhesive to mount each printed photo on foam board and trim the edges to eliminate crooked cuts or misshapen squares. Create a grid on your wall with painters’ tape before you hang your tiles to ensure they line up, then mount each one using small nails or wall-friendly adhesive strips.
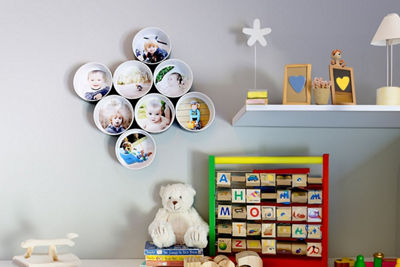
2. Create Round Picture Displays
Round picture frames are great for showcasing your photos in a unique and eye-catching way. You can hang circular pictures individually or group them to make a visually engaging display, adding a dynamic and modern twist to your decor. And when it comes to tools, you don’t need anything fancy. For example, you can turn a four-inch drain cap into a unique, eye-catching photo display using only 4" x 6" photos and a bit of wall-friendly adhesive.
Start by painting your drain caps to match your home decor, then select and print your favorite photos on 4" x 6" borderless photo paper. Both the Canon PIXMA TS7720 Wireless2 Home All-in-One Printer and Canon PIXMA TR7020a Wireless2 All-in-One Printer support borderless printing on different paper types so you’ll have the perfect prints for your display.
When your photos are ready, trim them to fit the inside the drain caps – use a vase or cup as a nifty guide – and glue the prints inside of the caps so they're flush against the insides. Once the photos and glue are dry, arrange the drain caps into a pattern and use the same adhesive to secure each drain cap to the next so you're not stuck hanging individual circles on the wall.
3. How to Hang Pictures on a String
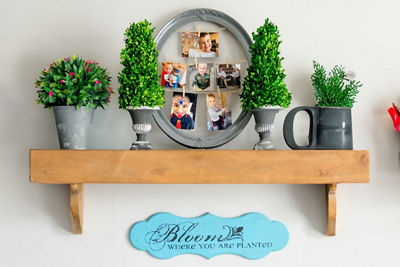
Frames are the traditional way to display photos, but you're not limited to using them in their conventional sense. Hanging pictures on string is fun for thematic collections like holiday photos, family gatherings, or your favorite pet shots. Simply remove the glass and add a few strings of twine, and you have a few custom clotheslines for your treasured shots!
Begin by choosing an oversized frame and hot gluing a few lines of twine from one side to another, leaving plenty of space between lines to allow your photos room to hang. Print a half dozen of your favorite snapshots and crop them before you print, then trim them with scissors so they are square and uniform in size. Using mini clothespins, suspend each photo from the string or twine and display the open frame on a mantle or shelf.
With simple tools and a high-quality photo printer, you can easily create stunning DIY photo displays that reflect your personality and style. Whether you prefer the refined look of picture tiles, the unique appeal of circular picture frames, or the quaint charm of photos on a string, these displays help you capture beautiful moments in a visually striking way. Get creative and start transforming your walls into a gallery of cherished moments.
- The Easy-PhotoPrint Editor software requires an Internet connection and is compatible with the following operating systems; Microsoft Windows 10 (64-bit/32-bit), Microsoft Windows 8.1 (64-bit/32-bit), Microsoft Windows 7 SP1 (64-bit/32-bit), macOS High Sierra v10.13, macOS Sierra v10.12, Mac OS X El Capitan v10.11 and Mac OS X El Capitan v10.10.5. Minimum Windows and macOS/Mac OS X requirements are: 2GB of RAM and a monitor with 1024x768 resolution. The Easy-PhotoPrint Editor mobile application requires an Internet connection and the Easy-PhotoPrint Editor app v1.1.0, available for free on the App Store and at Google Play. Compatible with iPad Air2 (2nd Generation), iPad Mini 4 and iPhone 6s or later devices running iOS 10 or later, and Android mobile devices running Android 5.x or later. Certain exceptions may apply. The following file formats are supported: JPEG, PNG, HEIF (devices running iOS 11 and mac OS v10.13 or later), DLP save data, Poster Artist export data, EasyPhoto+ export data, Easy-PhotoPrint Editor export data.
- Wireless printing and scanning requires a working network with wireless 802.11b/g/n capability, operating at 2.4GHz or 5.0GHz. Wireless performance may vary based on terrain and distance between the printer and wireless network clients.
Thanks for signing up!
The application has encountered an unknown error. Please try again in a few minutes!
By clicking Sign Up, you are opting to receive promotional, educational, e-commerce and product registration emails from Canon USA. You can update your preferences or unsubscribe at anytime.