
Hero Carousel content.

Gone are the days when engaged couples would sit for a professional studio photo to use in newspaper wedding announcements. Engagement photography is on the rise in the United States, as couples use social media to promote their upcoming weddings in a creative way. Couples use the photos in "save the date" cards, slideshows and even animated GIFs. Learn how you can give the future bride and groom the second happiest day of their lives with a fun engagement photo shoot.
1. MEET WITH THE COUPLE
As nice as it would be to just pick up the camera and take a few stunning snapshots, these types of photo sessions actually require a lot of planning. Start planning your session by meeting with the couple to discuss their preferences, brainstorm ideas and to make all the necessary arrangements. Meeting face-to-face in this capacity will allow you and the couple to become better acquainted and build a rapport, which will serve you well during the photo shoot. During this meeting, you should review all of the creative and technical aspects of the shoot. From scheduling to color scheme, there are certain details you need to know before you can pick up your camera. If the bride and groom don't have a concept in mind, ask them questions about their relationship and their wedding plans, and look for ways to incorporate these personal details into the photo session.
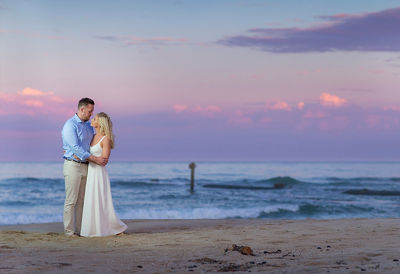
2. SCOUT YOUR LOCATION
As more couples opt for natural or "real world" settings, engagement photo sessions rarely take place in a traditional studio. Some settings are naturally more romantic than others—a beach at sunset, or a colorful botanical garden, for example. If you can't get out of the city, a nighttime shoot with the skyline as a backdrop adds instant sophistication and elegance. Some couples even opt to have photos taken in their own home. When determining where to hold your session, encourage the couple to select locations with special significance.
If you're planning to shoot at a venue or public space, check the venue’s schedule to ensure that your shoot won’t conflict with other events, and secure any necessary permits or permission to photograph onsite. Don’t just assume you can set up tripods or light stands, and conduct a professional photo shoot in public parks, beaches and so on…some do aggressively enforce permit requirements. Set aside some time prior to your session to scout the location. If you can, visit the site a few times to assess the area and take test shots — and try to do so around the time of day you intend to photograph your couple. Make note of available lighting sources, foot traffic, weather, and accessibility. Snap photos of potential spots for poses to see how many angles you can get and to determine your camera settings.
3. CHOOSE YOUR GEAR
With the right equipment, any location can be transformed into a romantic setting. The challenge is making sure you have the proper gear that is also mobile and lightweight.
Essential Equipment:
- Mirrorless camera, with at least one back-up camera on-hand
- Lenses (portrait-length telephotos, 85mm and above, are ideal…this translates to about 50mm and up if your camera has a smaller APS-C size image sensor)
- Camera bag
- Spare battery packs, and flash batteries (if applicable)
- Extra memory cards
- Off-camera Speedlite with softbox or other diffuser/modifier (optional)
For outdoor engagement photo shoots, one mirrorless camera body, along with a back-up camera — in case anything goes wrong — and a moderate telephoto lens, or zoom lens (like a 70–200mm, or similar lens) will be more than sufficient. Fixed focal length portrait lenses, such as 85 or 100mm, can be tremendously versatile, allowing you to shoot your couple from a distance as well as at close range — and they usually have wide apertures, which are great as light levels drop. The telephoto lens also compresses the background in portrait shots, creating a bokeh effect—a creamy soft, out-of-focus background.
If you’re shooting breathtaking vistas, add a wide-angle lens (such as a 24-70mm, or equivalent zoom for APS-C sensor cameras) to your kit bag. Many short zoom lenses also have a close focusing distance, which is great for getting the obligatory engagement ring shot. Consider adding an off-camera Speedlite and lightweight stand to your kit if you anticipate shooting portraits in low-light scenarios or at night.
Since you may be shooting with the Continuous “drive” setting, or capturing raw high quality images, you’ll want to keep spare battery packs and memory cards in your camera bag. Opt for memory cards with ample storage capacity and fast transfer rating to process images quickly.
If you’re shooting full-resolution RAW images quickly, your memory card’s write speed becomes a factor that can sometimes slow you down. Check your camera's instruction manual carefully to see which "speed classes" of cards your camera is compatible with, and what the minimum MB per second write speed suggestions are. You'll frequently find these listed among the VIDEO specs for your camera, since recording video puts a premium on card performance. Just be aware — not every camera can take advantage of the industry's latest and greatest high-performance memory cards, so look for cards from name-brand card makers that do meet your camera's write speed potential.
4. FIND THE RIGHT LIGHT
When shooting portraits—especially engagement photos—you want optimum lighting conditions. Shooting on location often means you'll be working with available light sources, which can be unreliable and unflattering. Harsh indoor lighting and midday sun often cast odd shadows on the face, which can be great for artistic portraits but maybe not for a "save-the-date." For guaranteed reliable lighting conditions, use an off-camera Speedlite to balance flash with ambient light. Even in sunny conditions, the Speedlite provides consistent, daylight-balanced illumination. Speedlites can be especially effective portrait lighting tools, if you can move them off-camera (using wireless flash features) and use modifiers like umbrellas, softboxes, and/or diffusers to soften their output. Although there are many lighting scenarios, one suggestion for portrait lighting is to position your softbox 30 degrees away from the camera and 30 degrees above your subjects’ heads.

The prime times for outdoor natural-light portraits are during the golden hours, that is, the first and last hour of daylight. Sunset offers dramatic lighting opportunities as well as soft backlighting, but you may feel rushed to shoot before you lose the light. If you don’t need to shoot head-on portraits with your couple, use natural ambient light to create interesting compositions.
For portraits where background isn’t important, overcast skies offer consistent natural lighting with softer shadows, even in midday. Because cloud cover acts as a natural diffuser, you can take advantage of a cloudy moment to get macro shots of the engagement ring.
A popular wedding photography trend is having a couple use sparklers during a long-exposure shot, outdoors at night, to announce their nuptial. Start with a setting of ISO 400, f/5.6, and a 30-second exposure. Adjust your ISO and exposure depending on available light and what you're drawing or writing with the sparkler.
5. CONSIDER COLOR
Use the Picture Style settings in Canon’s interchangeable lens cameras to save time in editing and color correction. A great starting point for good skin tones and moderating contrast is the Neutral Picture Style setting (keep in mind, at its default settings, Neutral cuts sharpening, so you may want to go into the Detail Settings for this Picture Style and boost sharpening to a level like 2 or 3).
Other interesting options to make subtle color changes to skin tones are the built-in Portrait Picture Style (which tends to add a magenta tint to skin tones), and the downloadable Canon Picture Style Files “Portrait Studio” and especially “Portrait Snapshot.” The downloadable files can be installed into your camera, using Canon’s EOS Utility software, with your camera USB-connected to a compatible Mac® or Windows® computer.

6. TAKE WARM-UP SHOTS
When you arrive on location, plan to spend the first 15-20 minutes of your session taking warm-up shots to give the couple time to relax in front of the lens. Guide the couple through several of the standard engagement photo poses to get them comfortable posing for the camera. Basic romantic poses include the hug from behind, the kiss, and touching foreheads.
7. GET CREATIVE WITH COMPOSITION
While formal wedding announcements still call for traditional poses, general portrait photography is no longer limited to old-fashioned head-and-shoulder poses. If your couple is willing to cut loose, you can experiment with interesting poses and unconventional cropping. Start with your basic poses and shoot each one from several angles. Use backlighting and props to create dynamic compositions. Look for opportunities to stage romantic moments and encourage your couple to indulge in a little PDA. With your telephoto lens, put some distance between you and the couple to capture a few tender, candid moments.

If you introduce any action elements such as bubbles or confetti, adjust your shutter speed according to your artistic preference. If you want to freeze a scene of your couple playfully blowing bubbles, a shutter speed of 1/200 sec. or higher will preserve the bubble detail. Put your camera on a tripod and use a slower shutter speed like 1/50 sec. to blur the motion of falling confetti. Capture sequential motion in continuous shooting mode, which depending on your DSLR model, can capture three or more images per second.
8. SHOOT RAW IMAGE FILES
Although these high quality files require a lot of storage, shooting RAW images offers greater flexibility in photo processing. With RAW images, you're able to correct over/under exposed images, adjust white balance, and edit Picture Styles without losing detail or color information in the original files. Whether you process RAW files in Canon’s Digital Photo Professional (DPP) software, or a third-party software program, optimize your settings to get the look, color and tones you want when you process the RAW images. Then, any final retouching or adjustments can be made in an image-editing program, such as Adobe® Photoshop® or similar software.
9. PAY ATTENTION TO DETAIL
Every bride-to-be wants the details of her wedding to be absolutely perfect, and engagement photos are no exception—the tiniest piece of lint or hair out of place might send an otherwise perfect shot to the reject pile. When composing shots, be mindful of background details that could interfere with the couple's appearance, for instance, a streetlight sticking out of the groom's head, and even little things like debris on the ground, or passers-by in the background. In the event of a hair mishap, a wardrobe malfunction, or a quick make-up retouch, keep an “emergency kit” in your camera bag stocked with tissues, a small mirror, a disposable comb, moist wipes, and safety pins.
10. MANAGE YOUR TIME
The couple shouldn’t be watching the clock, but you should. If you’ve agreed to a set time frame and are shooting in multiple locations, keep the session on track by taking fewer shots or reducing the number of planned poses. Simply communicating clearly, before and during the shoot, can be a really effective way to minimize wasted time.
The purpose of engagement and wedding photography is to celebrate and commemorate the love between two people. As an engagement photographer, you're not only capturing moments, you're creating memories that will last a lifetime.
All photographs in this article were taken by Wedding Photographer and Canon Explorer of Light Vanessa Joy

Thanks for signing up!
The application has encountered an unknown error. Please try again in a few minutes!
By clicking Sign Up, you are opting to receive promotional, educational, e-commerce and product registration emails from Canon USA. You can update your preferences or unsubscribe at anytime.