
Stepping from available light into the world of strobes is one of the most critical moves a photographer can make in their career. It can also be extremely intimidating. To combat the terror and suspicion, I encourage photographers on this journey by telling them to start with one light. Just one. Almost every photographer I know, no matter how new they are, has a Speedlite in their kit. Showing you what’s possible with just the one light that you already have seems like a good place to start, so here are five tips that will help you along the way to mastering it.
Hero Carousel content.

Jul 2, 2018
1 Speedlite, 5 Photography Tips
Too many photographers are hung up on gear. How much; what kind; what’s next? Not enough of us take the time to look at the tools in our hands and ask ourselves: Have I pushed this to its limits? Do I really know how it works? Years ago when I got my first DSLR body and lens, I remember asking my dad (an accomplished pro) “What lens should I get next?” He looked at me with a half-smile that I will never forget and said: “Learn to use the one you’ve got first.” That lesson has carried me through the years of my professional career and has been the catalyst behind my love of the Speedlite.
When I first started, Speedlites were almost exclusively used on-camera, leaving the heavy lifting of off-camera lighting to bigger, more expensive lights. It was with very little money in my pocket and my father’s voice in my head that I turned to my humble collection of gear (including a VERY used Canon 430EX Speedlite) and decided that I would make do and move forward. After a series of experiments with triggers, cables, and brackets, I started to find my footing. Eventually, I grew not only to be proficient with my small and agile friend, but actually to prefer it to almost everything I have ever used. Thirteen years later, when I head out the door to a job, I still reach for my Speedlites first.
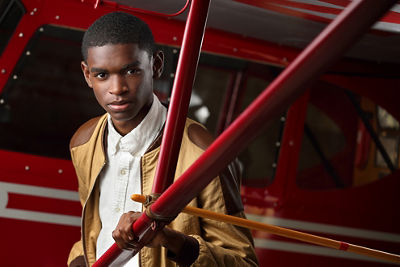
This image, taken in an airplane hangar, utilizes the strong direction of light from the hangar door as the main light on the subject’s face. Using a Speedlite with a small umbrella as the edge light (behind the subject and out of frame, camera right) added additional dimension to the image.
1. Know Your Equipment.
This might seem self-explanatory to you, but you might just be shocked at the number of photographers I know who buy a piece of gear, never practice with it or read the manual, and then take it on a shoot. Ever since my early days, I have had a rule: Never test a new piece of equipment or technique on a client. It has served me well. The last thing you want is to be fumbling around trying to figure out how to get your Speedlite out of ETTL mode while your subject is standing there, slowly coming to the realization that they might have hired the wrong photographer. Read the manual, understand how it works, then test the heck out of it taking pictures of your friends, partner, and your cat until you can operate the thing blindfolded. Even with that kind of practice, you will still run into hiccups, but the better you know your gear, the less likely it is that those hiccups will derail a session.

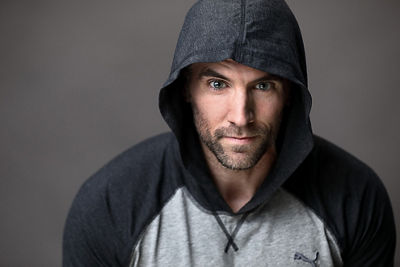
By photographing this subject under an overhang in the shade, I positioned him where the natural light was forced into an appealing direction to create dimension on his face. I used a Speedlite here as an edge light to highlight the sweat and grit as well as create more contrast and dimension.
2. Use the Right Light Modifier.
There is no shortage of options when it comes to picking a light modifier for Speedlites. The mechanism a Speedlite uses and the rectangular shape of the head are quite a bit different than those of a typical studio strobe. Picking a modifier that complements those attributes will get you the best results. Over the years, I have come to favor parabolic umbrellas for a couple of reasons: First, they require you to bounce the light onto a surface that reflects the light back at the subject rather than shooting straight through a diffuser. This breaks up the small light source and spreads it out more evenly, giving you better use of the light. Using a shoot-through umbrella or softbox can give you a hot spot in the center, which can make it harder to illuminate a subject evenly. The shape of the parabolic umbrella, combined with a diffuser cover, gives the humble Speedlite a quality of light that will rival any studio strobe on the market. Second, it’s not insignificant to note that umbrellas are very inexpensive by comparison to softboxes and they don’t require any proprietary mount. Any photographic umbrella will work just fine with pretty much any light you own. Umbrellas come in sizes from 24 inches to 8 feet wide, and being as affordable as they are, you can probably afford to have a nice array of them for just about any shoot.
Using a Speedlite with a large modifier (in this case a 60” parabolic umbrella with a diffuser cover) can allow you to create soft light that more easily balances with natural, available light outside.
3. Know When to Use TTL (Through The Lens) Flash vs. Manual Flash.
Speedlites that talk to your camera, like the Canon 600EX-RTs (even wirelessly!)*, can do some pretty amazing things. TTL has been around for a long time now, but until about twenty years ago it was limited to flashes that were attached to the camera’s hot shoe. With the wireless technology built in, you can easily put the heavy lifting of lighting ratios and power settings on the shoulders of your equipment. This can be a blessing or a curse, depending on the situation. Knowing which mode (Manual or TTL) to use in which situation is an important step to mastering the Speedlite. In the days when I was shooting weddings, wireless TTL came down like an angel from heaven to bless our tired and feeble minds. It made it possible to shoot a wedding reception, moving from place to place and subject to subject, without having to tinker with your flash too much. The technology has also led to photographers trying to let the camera and flash do the work, producing very mixed results. In a portrait session, it’s usually preferable to test the light, lock in your settings and fire away, knowing that the equipment isn’t going to give you a different exposure every few clicks. Here’s an easy rule to go by: If your feet are mostly staying planted in one spot, Manual is the way to go. A photographer’s best tool will always be their knowledge of the craft and their control over the tools they use.
* From the late 1990’s until 2012 Canon wireless off camera flash system was handled through optical transmission. In 2012 Canon introduced the 600EX-RT with built-in radio transmission and it changed the game of RELIABLE off-camera flash. As a reference, Canon’s automatic TTL flash system uses the term ETTL II, standing for Evaluative Through The Lens second generation metering.
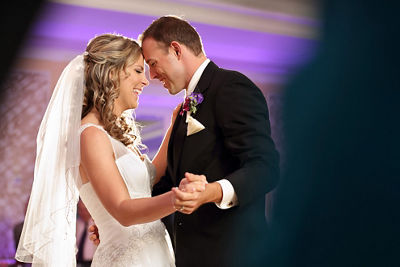
Using a Speedlite in TTL mode can be extremely useful in a situation like a wedding, where you might be constantly moving through changing lighting conditions.
4. Don’t Fight the Light.
Speedlites are made for shooting on location. Portable, powerful and easy to use is the perfect combination for a photographer on the go. The biggest mistake I see fledgling strobists make is where they place the light. You can add a lot of power and contrast to your images with a Speedlite, but always remember to take note of which direction the available light is coming. It is usually a better idea to place your subject in some existing, natural light and then add to it. Very often, you will see a photographer place an off-camera light on the opposite side of the subject from the existing direction of light. The resulting image is usually flat and uninteresting. If there is a direction of light naturally on the face of a subject, don’t fight it; go with it. Use that Speedlite to create drama, depth and dimension.

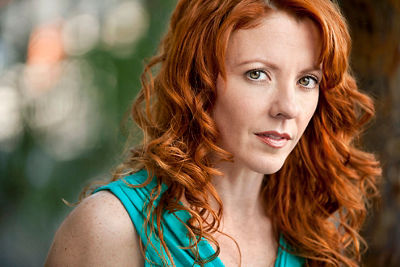
Using a Speedlite modified by an umbrella from camera left, I enhanced the natural light instead of working against it. A Speedlite is also a great way to add catchlights that add depth to the image.
5. Your Speedlite Doesn’t Always Need to be the Main Source of Light.
While you are sharpening your Speedlite skills, remember that it is as important to know when not to use your Speedlite as it is to know when to use it. Very often, you will find yourself in a situation when the available light provides great illumination on your subject, and you may not want to add any additional light to the face or body. It’s then that I will look for other ways to employ my Speedlite. I might use it as an edge light to add dimension, a background light to separate the subject from the background, or even a fill light to lighten the shadows in a portrait. The most important principle to understand is that a photographer’s job is to evaluate the light in any given scene and to then decide what to add or take away. The more control you learn, the more powerful your images become.
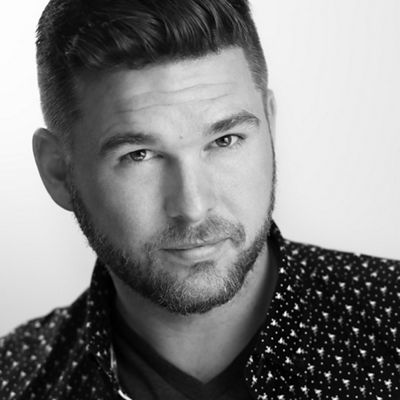
By using a Speedlite to enhance the direction of the available light, I was able to add contrast to the image without overwhelming the already pleasing light in the scene.
Like any craft, photography takes thousands of hours to master. Even after that you will still find yourself learning new concepts and struggling with them. Trust me, we all do. The good part is that every skill you learn goes into your toolbox and you can reach for that tool whenever you need it. The more skills you learn, the more tools you have. Don’t put off learning off-camera lighting because you like your natural light style. Style isn’t what you do because you don’t know how to do anything else. Style comes from the tools you choose to use, even though you know you have the skills to do it another way. Remember that your journey to mastery can begin with just one light.
NEED IT FIRST
Sign up for up-to-the-minute Canon News, Sales and Deals.
SUBSCRIBE

STAY PLUGGED IN WITH CANON
Thanks for signing up!
The application has encountered an unknown error. Please try again in a few minutes!
By clicking Sign Up, you are opting to receive promotional, educational, e-commerce and product registration emails from Canon USA. You can update your preferences or unsubscribe at anytime.
LEARN WITH CANON
Discover great new ways to enjoy your products with exclusive articles, training and events.
Learn more